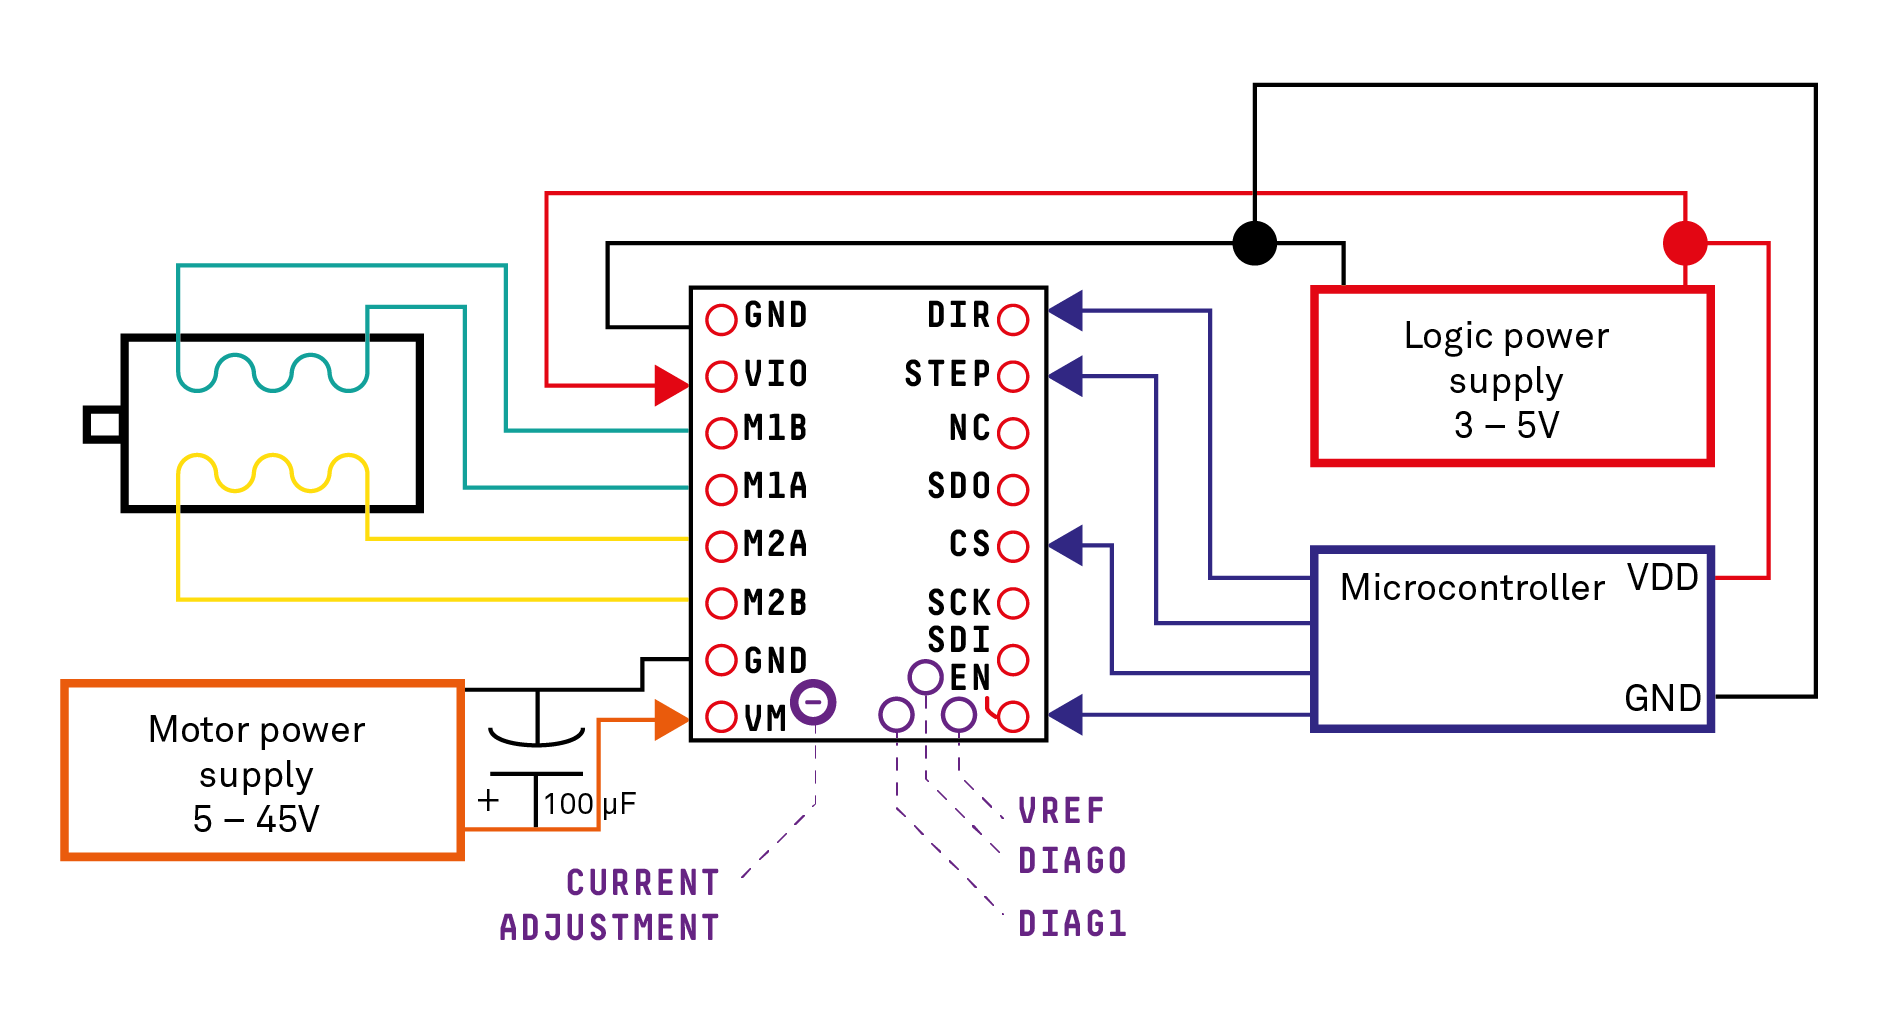
In my latest work *Continuous Erosion* I (finally) got to use the super slick and quiet TMC2130 stepper drivers. They are awesome! The version I am working with is the one from FYSETC: white pcb with the blue thermal relief element.
One thing I noticed while researching these bad boys was how equally badly documented they are for a quick setup. I ended up looking at bunch of RUMBA and RAMP diagrams for reasons I understand but someone who just wants to play around with these drivers might be lost.
Although I found some wiring for the TMC2100 – the more basic version of this driver without the SPI interface. The TMC2100 version doesn’t need a connection between the Microcontroller and CS Pin (Chip Select) and when I applied the diagram, my TMC2130 wouldn’t work right away. Or maybe I have missed that important part somewhere.
Anyways, here is a quick wiring diagram for the TMC2130.
The TMC2130Stepper library works great, even with the NodeMCU V3 I am currently using.
while re-working our installation for this year’s Resonate 2016 festival, we are doing things a bit slower now. and since i am talking about us here, i also mean the fine people Irena Kukric and Luiz Zanotello. back then in april, we only had two and a half weeks to force the project through from the very start til the bitter end. meaning:
– concept & idea phase
– prototyping & testing
– realization: building, programming, lot of sweat
– finishing touches, shipping, setting up and presentation
obviously some things you can’t force, if you don’t have enough hands or money. in our case, at least at that point, money wasn’t the problem but the scale of the project and thus a lot of missing hands. i’d say, we conquered the first point quite fine. we had some nice concepts, iterated on them and were always trying to work out our way from last year’s project ‚Automatic Orchestra‚. this time we wanted to tackle and aspect, last year’s team didn’t get to touch at all: movement and sensing.
so we took the liberty and built upon already existing software and hardware and tried to alter the experience, so i wouldn’t just turn out as an Automatic Orchestra 2.0.
i don’t want to go into detail about things that went wrong in april. i’ll take my time to elaborate on this in a different post in the future. today i’d rather talk about the second point: prototyping and testing.
due to the time constraints, we never got to proper prototype our sketches and design from paper. under a lot of heavy pressure, things start to make sense in your head and you tell your team members: yes, that’s the solution we need *right now*. so for most of the cases, we only iterated one, maybe even two times on our designs. not more, which is a huge mistake! but how did it come to this?
we were quite sure, that working in a modular fashion turns out just fine, but it didn’t. not just by itself. every module on its own can work quite fine and without any problem, but the sum of all modules is by far greater than expected. which is a known fact. so is also the sum of all errors. fact, too.
iteration is most important. it gives you agility, flexibility and control over what you are doing. on the downside, it is quite time costly. many great projects started quite simple and only evolved over time. in memo atken’s works, a re-occuring pattern of „simple harmonics“ can be seen.
maybe even started as a creative coding sketch, where different particle with different velocities can generate quite dynamic patterns, he turned it into something beautiful:
even a perfomance emerged from this, through iteration over projects:
but what does that mean for us?
we wanted to iterate over Automatic Orchestra without giving up own aesthetics for a new project.
so it was an iteration over the hardware, right? sort of. the software from before mainly consisted of a pcb, the PROTOSEQ, and some speakers and a monopod stand. that’s not a lot to take away.
so we took the heart of automatic orchestra, the PROTOSEQ, and tried to hide it inside of a wooden box. so far, so good. but this is the point, where things started to to awry: modular design needs a lot of testing. we didn’t have that time, so a lot of weird mistakes no one was thinking about started to emerge only when we set up the installation in belgrade at the kinoteka installation site.
for example: cable connections between the inside (PROTOSEQ, motor) and the outside world (speakers, power supply) were totally overlooked! to be more precise: a power supply cable coming from the outside would have to go through a little hole and be screwed on the pcb – directly. that is a huge no-go no one from our team has thought about in advance.
why? maybe because we never put together a whole piece – or also called pod – before we even left germany. maybe there was just too much other stuff to handle.
so what was in this special case the punishment for such a design error? simple: a pod would be connected to the power source in a manner, that moving around is a hard task. disassembling cables can only be done from the inside. so if we wanted to move the whole installation, we would have to drag all pods one by one, with a lot of more hands!
what would be a solution then? also that is quite simple: a hardware interface. some plate, that sits on the outer face of the pod’s wooden case, has all the cables from the inside already connected and invites us just to plug in cables from the outside easily.
we had to find this out the hard way, like so many other things in the project, but we are now quite happy working on it again. making the installation run smoothly, without any construction errors and easy to handle software.
from this hardware interface story and the (more or less) missing iterative part of our project, i want to come to the current state of project. right now, in our team of three, i am in charge of designing the exact parts for the construction. all of this has to be done on a tight budget – literally none. so what to do?
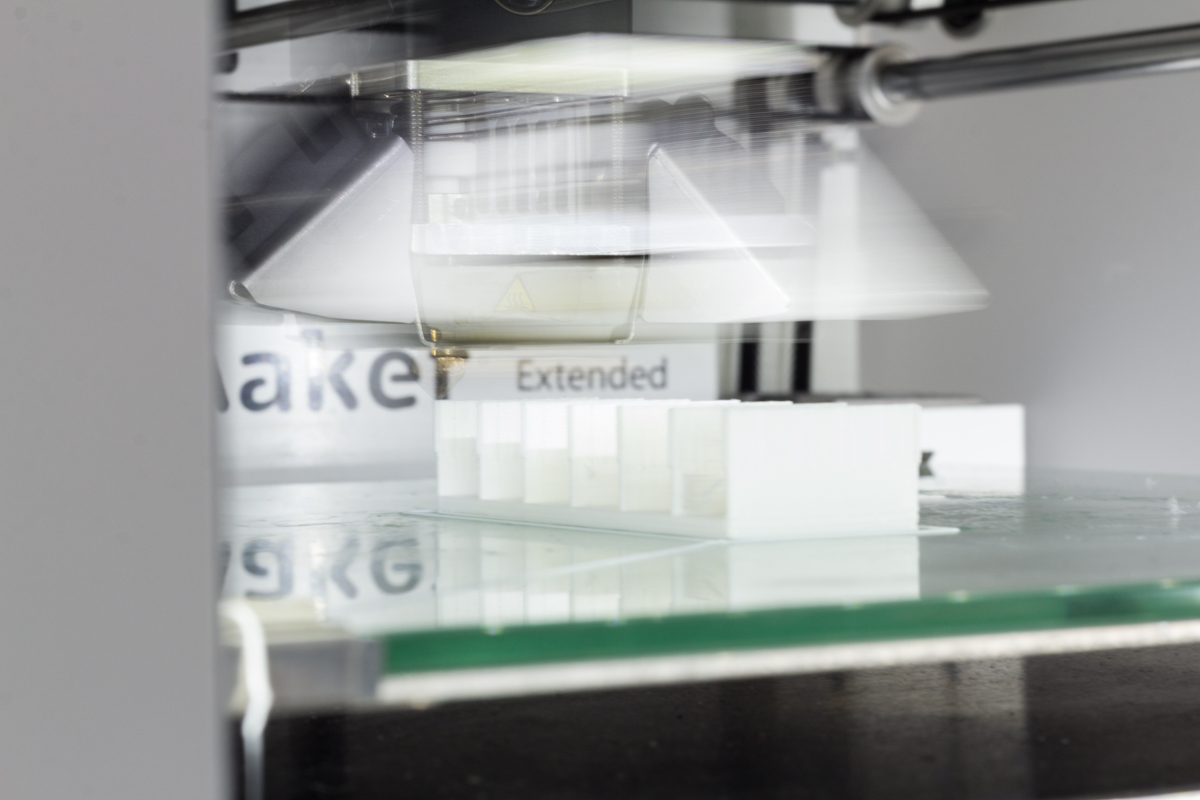
good we have access to a Ultimaker 2 3D-printer. especially in the case of the hardware interface i want to show two things: how do you create on a small budget and how do you iterate over a design?
with the help of the UM2 printer i can quickly pump out designs from my cad program Fusion 360, which i only got to learn in the last few weeks and already got quite proficient in it.
the material costs are vanishingly low, which makes it a prototyping tool of the first chop!
but the main critical point of the whole project is the repetition of the several pods: we need them seven times. that means, completing one pod and having expenses in the amount of several hundred euros is a no go, since we have to multiply a few more times to get the whole installation. so trying to save on every part we have to buy is an absolute must!
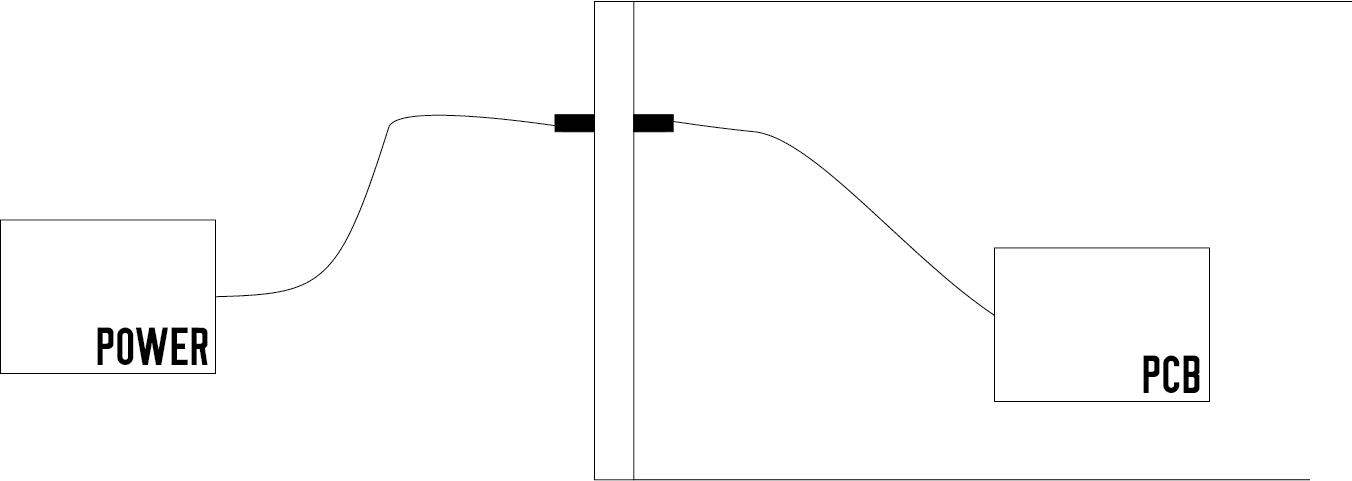
how about the hardware interface again? we want to connect two cables, inside and outside:
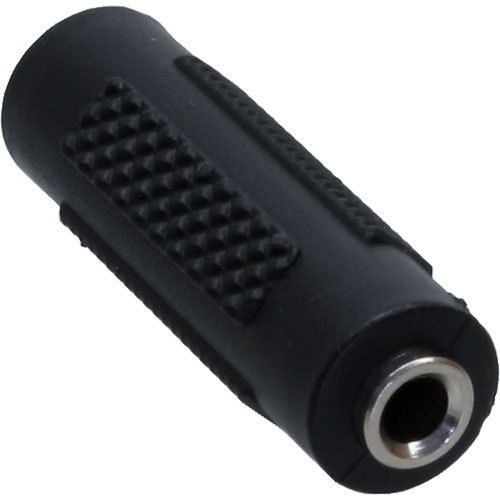
there are solutions on the market, like this here:
but they are also price heavy: 2€ a piece. and we need them on each hardware interface six times (midi in, midi out, speakers, etc), so that’s 2€*6 = 12€, and in total we need this 7 times for our seven pods: 84€. just for stupid adapters. and then we can’t even properly attach them to a front plate. so how about this approach: let’s use our brains and make something useful!
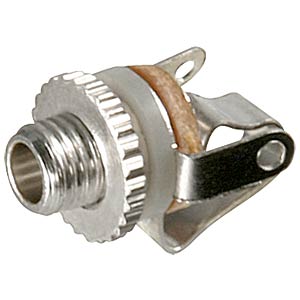
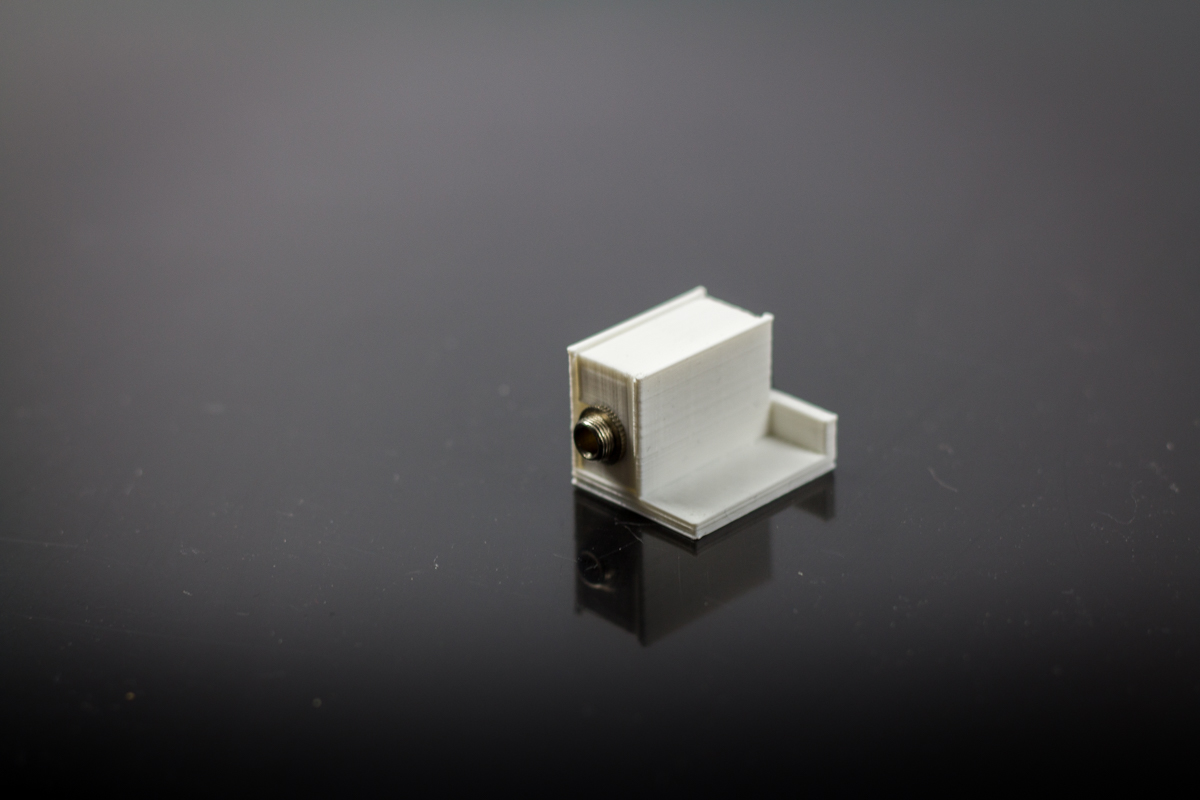
Klinkeneinbaubuchsen at reichelt.de – 0,21€. and they’re even screwable. the idea here is to come up with a design that’s combining two of these assembly audio jacks into a modular design. how about this?
as shown above, there is a clear iterative process to be seen from left (initial design around the jack) to the right (current one). after a lot of measuring, these assembly jacks are quite irregular shaped, the idea from putting the jack into the box from the top changed to a sideway entry approach. why?
i just didn’t want to have them to be modular, but also stackable! so putting from above turned out to be a bad, since there would be always the next module on top blocking access. but how to solve this?
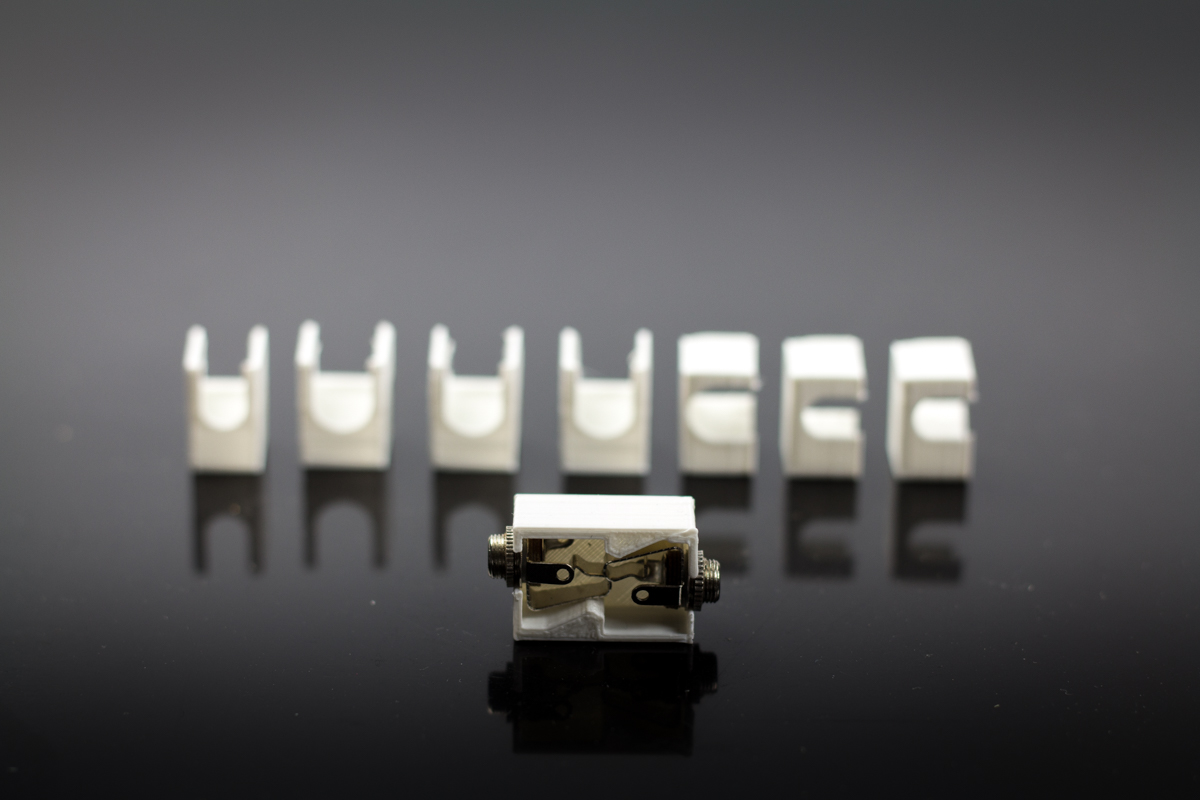
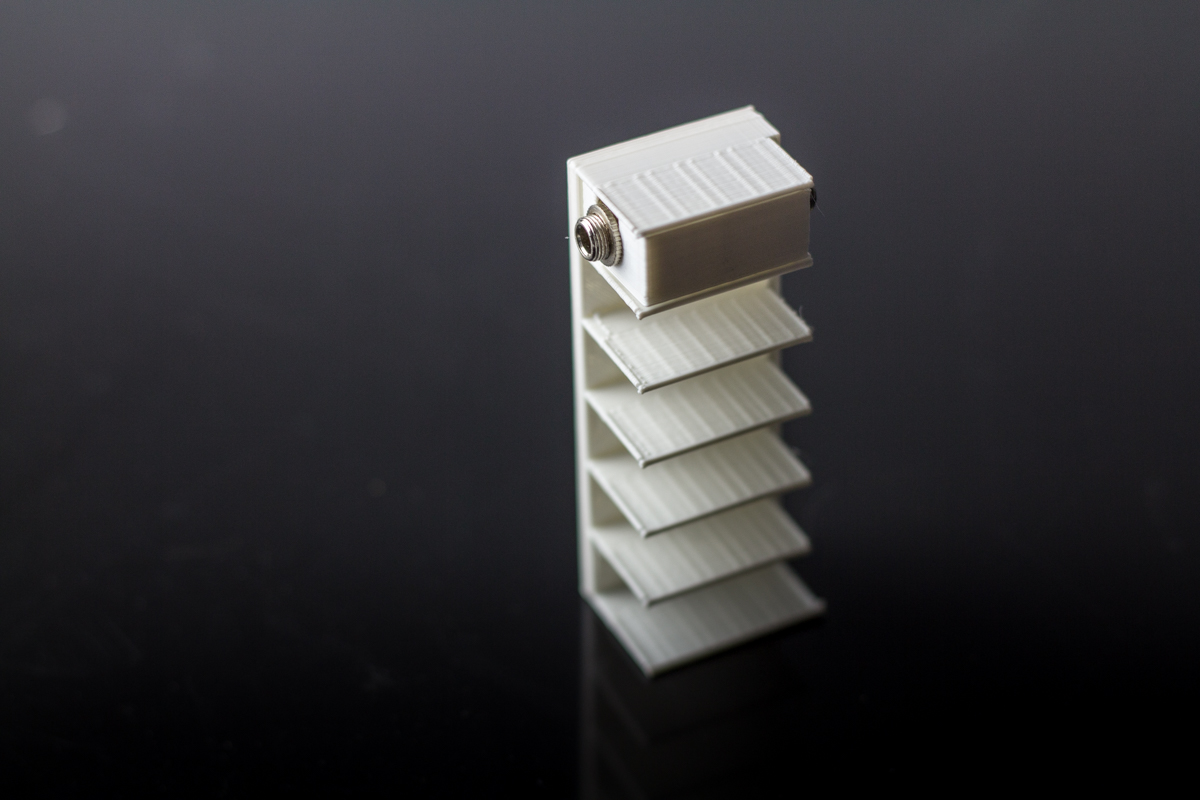
the current solution is this one:
pre-solder the two jacks and cramp them inside the box. fasten the screws so the whole inner part doesn’t move anymore and then…
put them into a small rack for holding them in a stacked manner. ok, the design is not quite finished. there are still things missing: attachments to a front plate or a side plate, to prevent the jacks from getting out sideways, but this can be produced quite fast.
and the overall cost? (0,21€*2 two sides)*6 jacks = 2,52€ (!) * 7 = 17,64€ for the whole set + a bit of material cost.
in my opinion that’s not bad and saves a lot of money for other parts, which are not that easy to produce.
I ordered parts on Amazon right away (beginning of february) , but thank the chinese heavens I only got them a few days ago. this is bad. not even AliExpress is that slow, unless they lose two total parcels – which I totally needed.
so the moral here is:
– if you got time to spare and don’t have so much money and you are also prepared to take some risks: go the chinese route. aliexpress. worst case: you have to talk to the seller and resolve everything in a dispute and ask for your money back. i had to do this twice.
– if you are wealthy enough. just buy the stuff at your local online shop and receive the goods within few days.
anyway. here is one of those beauties which is going to get a proper hacking treatment the next few days.
I finally got around to refresh this portfolio. Switched from good old Stacey to WordPress, from literally no CSS grid to Bourbon Neat. Ah, the joys of having everything semantic and clean.
Furthermore I imported all posts from my secret thesis blog, which I kinda forgot for a long time. I thought it might be better to just write more profound posts here – so called sketches! I think I’ll like that format way much better, since I got to get better at writing stories in the next few months anyway /hints.
In the works section most of the images have not been updated to higher resolutions. I will fix this in the next few days.
Since I don’t want to have people touching plants *all* the time, I want to have input via breath – as mentioned earlier.
But what if I want to rely on some touching? Then I run into the problem that touch is binary.
I guess I also want to build this: http://www.instructables.com/id/Touche-for-Arduino-Advanced-touch-sensing/
or engarde: http://spritesmods.com/?art=engarde
update: build the „touché“. it’s working wonderful on a water bottle, but no response on a plant yet.
I am now in contact with Mr. Nóbrega and his giving me some hints on how to handle the plant. For now I’ll try out first what he is advising me and then will update this post on how far I can streamline the workflow on the plant module.
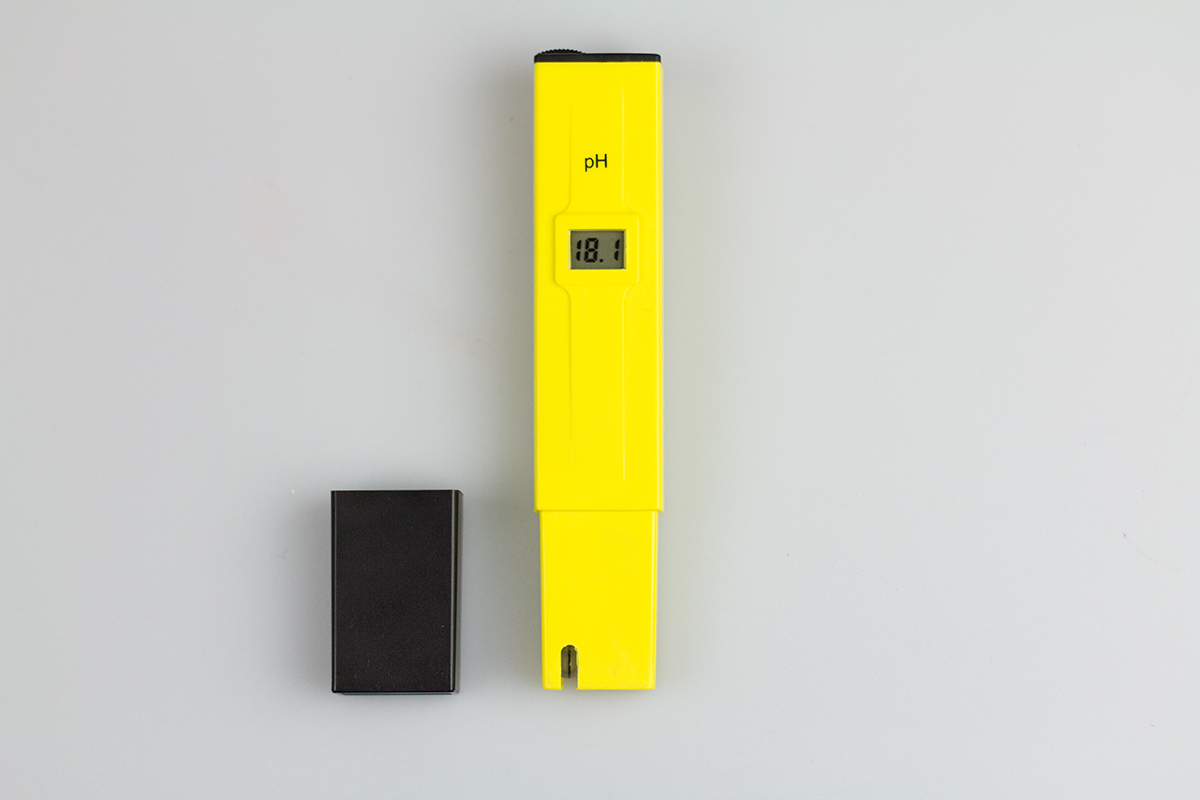
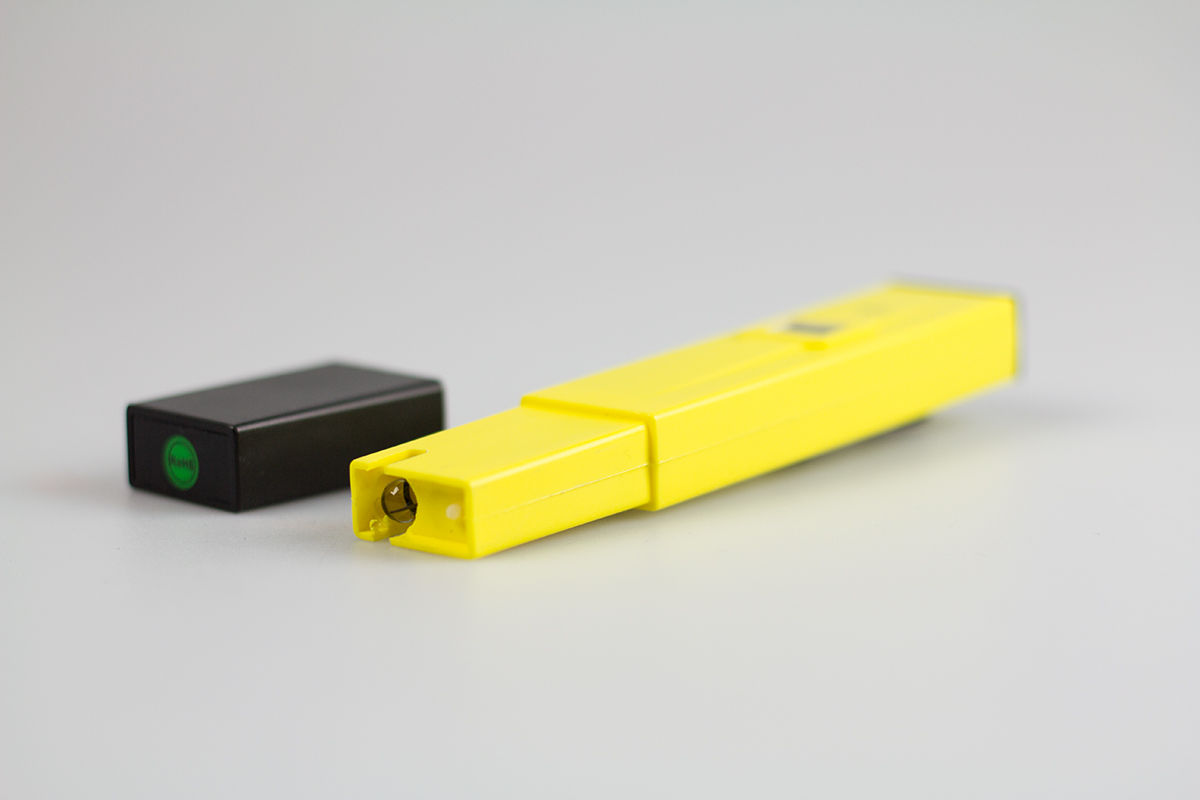
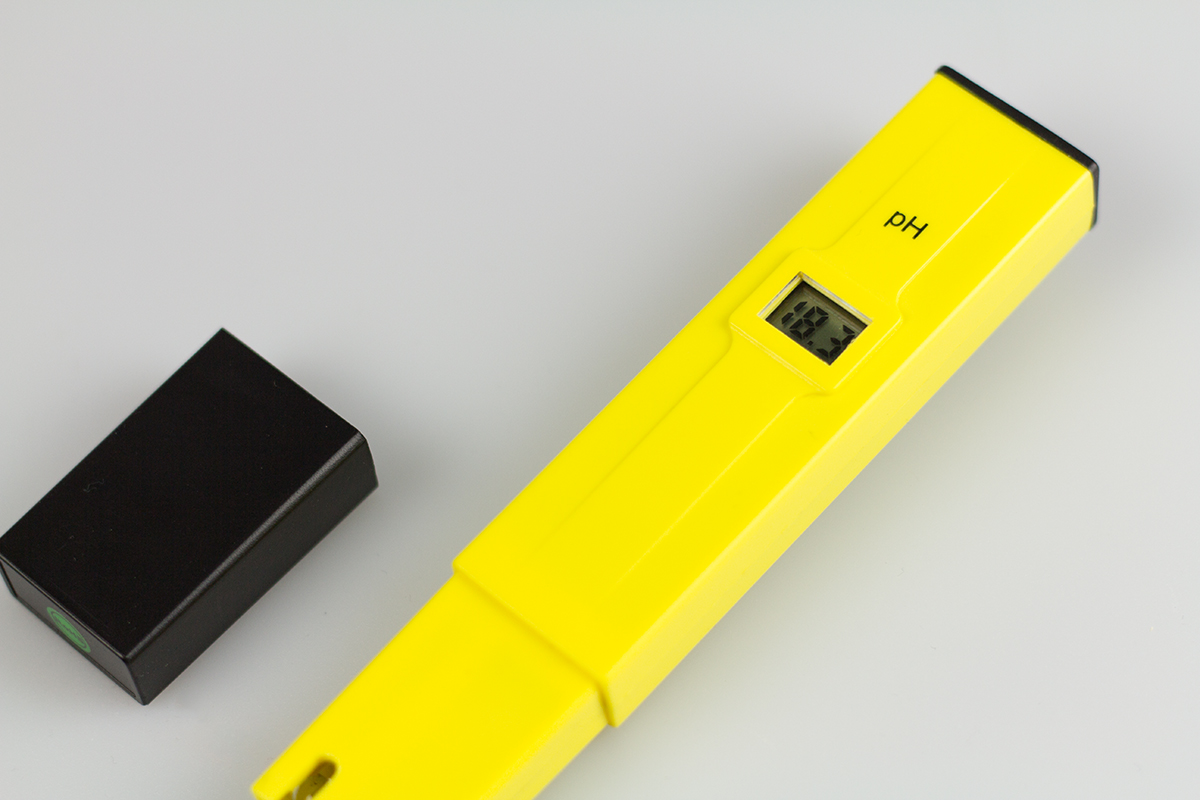
*problem*
usually these pH electrodes don’t like to be rammed into raw earth, but I think in my case it’s okay if i do these simple steps:
1. put a hygrometer next to electrode in the soil
2. when soil is not wet enough, go drip sour or alcalic water
3. only if the vater is more than just moist (wet!) go ahead and take a sample of the pH value
this should more or less mimic the following process of taking some earth, dissolving it in pH-neutral water and then putting the pH testing sticks inside. well, hopefully.
I got two (more or less) working circuits now.
It’s kinda difficult for me to say which one right now is better since they are structured quite different.
circuit a: is able to detect touch on a plant anywhere, but has no ground so it’s basically a giant resistor. it’s sort of useful, but only until the point where you want to put up for example a hygrometer. then putting the GND to literally ground/soil is causing the whole thing to fall apart. not good
circuit b: is hard to balance, but gives good result. only on one leave tho. i feel like the plant is reacting to light/breath better, but I guess a circuit b plant needs more than one sensor (electrode) per plant.
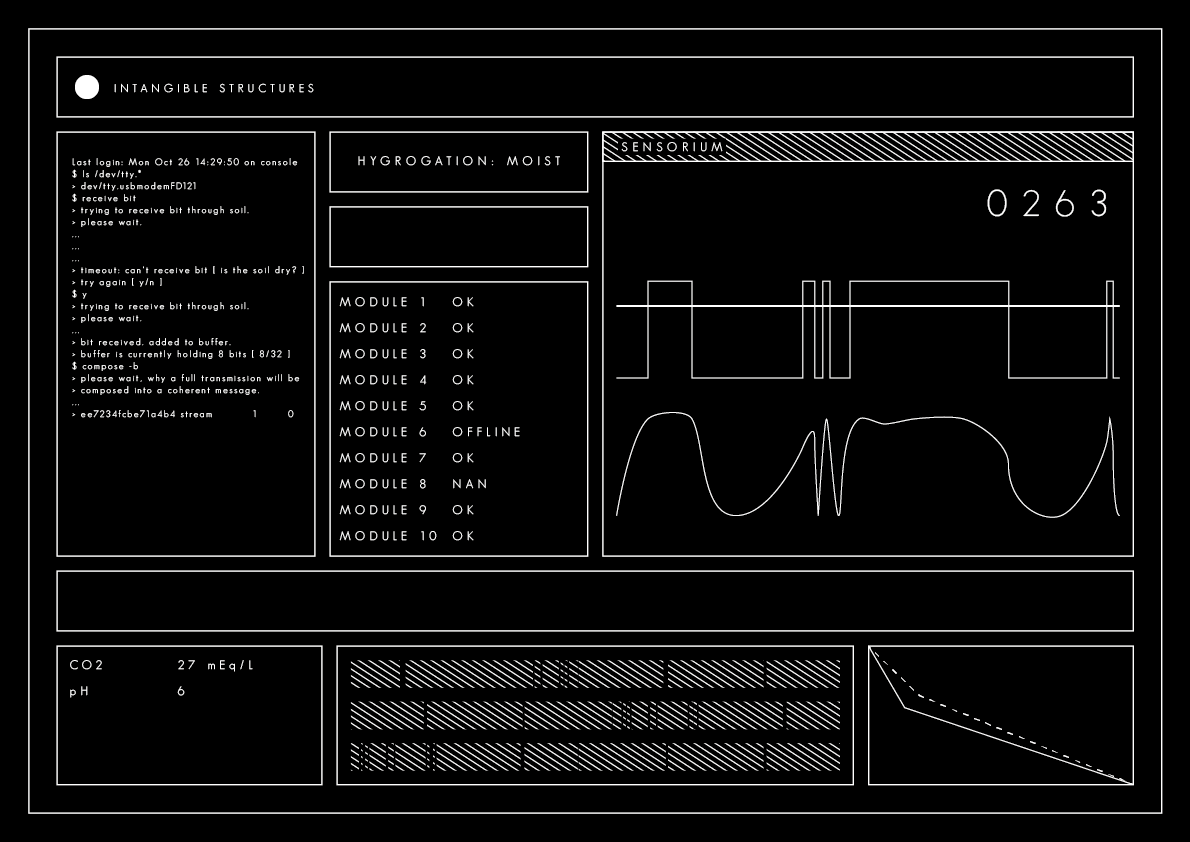
the modules (eg. plants, sender, receiver, transceiver, …) should carry small OLED display which hold information.
I want to have those 1.3″ (I2C/SPI) white OLED display and establish a common visual language. for that reason i made a quick mockup in a terminal-style, since the displays are very limiting space-wise and I want to have some real time data observable all the time.
a wheatstone bridge is able to pick even small changes in resistance on very low-current systems (e.g. plants). so a clip which is measuring/dividing voltage on a leaf is able to detect even micro-amp changes by breathing.
US-Forscher haben eine einfache Methode entdeckt, mit der sich die Produktion nützlicher Substanzen in Pflanzen steigern lässt: Man setzt die Gewächse unter Strom. Schon drei Stunden bei 10 Milliampere reichen beispielsweise aus, Erbsenpflanzen dazu zu bringen, die Produktion eines natürlichen Antipilzmittels auf das 13-Fache zu erhöhen. In Zukunft könnten auf diese Weise medizinische Wirkstoffe, Pestizide oder andere kommerziell wichtige Pflanzenstoffe günstiger hergestellt werden als bisher, glauben die Forscher. Sie betonen, dass die Behandlung sehr schonend sei: In den Versuchsreihen habe keine Pflanze durch die Elektrotherapie Schaden genommen.. Artikel aus dem Bereich Pharmazie
What am I trying to say here?
In his Meisterschüler project, Felix Beck wanted to do „something with sea urchins“. He built a hybrid media object, that would be classified in the animalia kingdom as a anthozoa.
The way he presents his project really inspired and provoked some thoughts I had. Back then, working on WILD&TAME and only being presented with Felix‘ work, the W&T project got a new drift and was converted from being a mere simple toy and upgraded to a (more or less) proper artefact of a story.
Tho it never got the proper documentation treatment (wall charts like in biology books) it was sufficient enough.
In Tether, networking was a huge topic. How do we connect everyday objects and what do we want from the Internet of Things. Excursion into this field. Working on a style, getting materials to know.
Sensopoda: Rapid-prototyping, material studies, working on style and putting in some subtle nods towards the zoanthroid by putting a camera assistant tool in the order of Octopoda.
The Assembly: Robots + Algorithms, Nature + Staging = Storytelling
In Assembly it made the most sense to me. Combining staged photography of (ded) animals and so called giphoscopes as substitutes for display, one could explore the space inbetween what the picture was saying and what the giphoscopes was trying to show you.
If I now take from every project a bit, follow my ongoing traing of thoughts over the years and put my aquired skills together, I think this is where you will find my thesis‘ end product then.
Coherent storytelling, critical aspects, physical objects that will have function and maybe a bit of staging magic, to give it a spin.
Arthropoda – includes insects, arachnids, and crustaceans
Chordata – includes vertebrates and, as such, human beings
* Kingdom Chromalvaeolate – a group of eukaryotes that represent descent from an organism that had an endosymbiosis between a line related to a bikont and a red alga. However, the monophyly of this group is challenged.
—
the plantae kingdom is already using the fungi kingdom. the animal kingdom has to catch up!
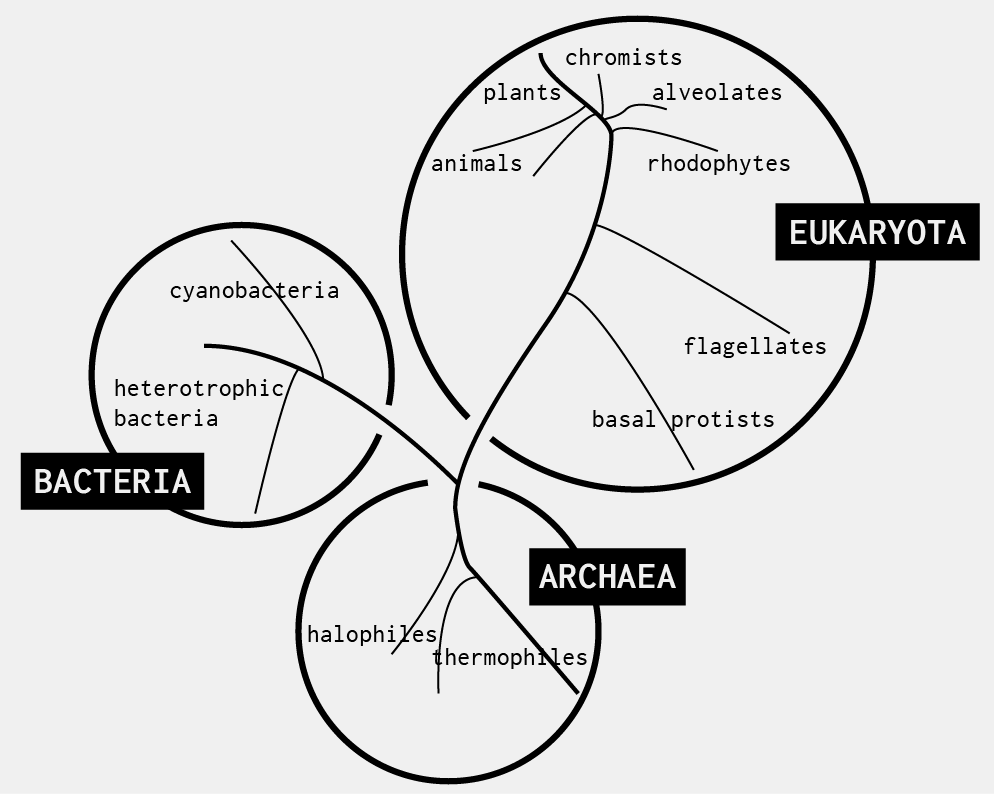
Eukaryotes belong to the taxon Eukarya or Eukaryota. The defining feature that sets eukaryotic cells apart from prokaryotic cells (Bacteria and Archaea) is that they have membrane-bound organelles, especially the nucleus, which contains the genetic material, and is enclosed by the nuclear envelope.
on this so called earth there are three domains of life.
The diversity of life is truly amazing, but all living organisms do share certain similarities. All living organisms can replicate, and the replicator molecule is DNA. As well, all living organisms contain some means of converting the information stored in DNA into products used to build cellular machinery from fats, proteins, and carbohydrates.
we are all somehow connected by using DNA as a information storage, but humans have a monopoly on sharing information digitally. the internet in it’s basic form is only accessible to us bipedal evolved monkeys from the eukaryota domain.
sharing at least digital information with or through others is one my goals.
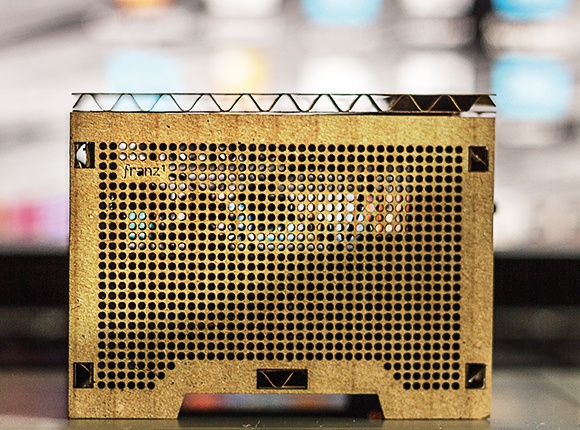
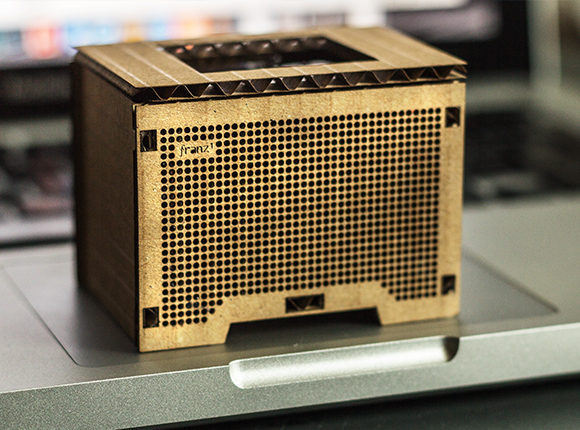
A sound module, utilizing a Hex inverting Schmitt-Trigger to produce a simple oscillator. On the right-hand side, the franz box has a potentiometer to fine-tune the amplitude. On top sits a solarpanel.
This little artefact can be placed anywhere and Franz gets louder over time, as he collects more sun.
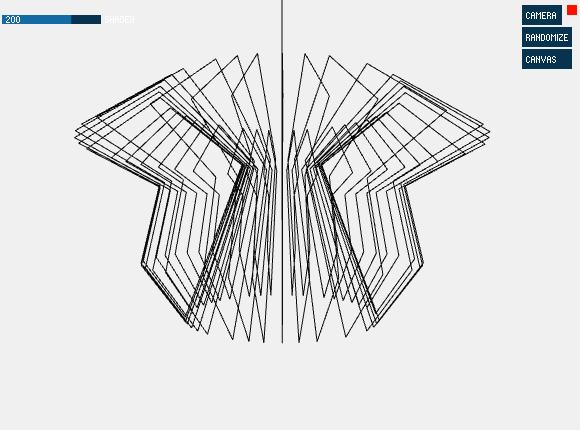
The birdcagegenerator maps the possibility space of a shape with 6 vertices revolving around one axis. The shape can be influenced in real-time and the output is visible immediately. As one result, the shapes can be exported from the program and be loaded into, e.g. Adobe Illustrator or directly be cut out with a lasercutter
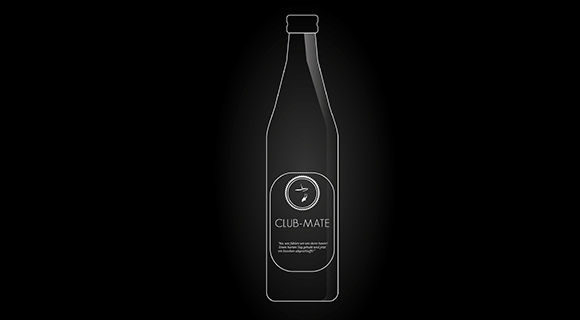
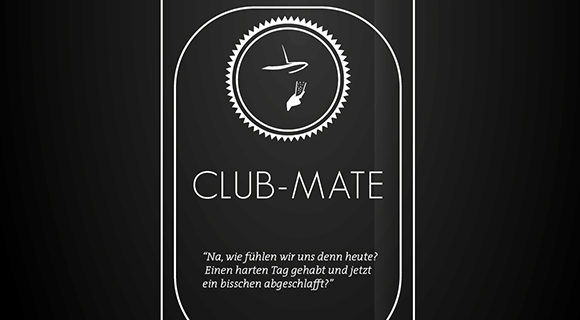
What if the popular drink „Club-Mate“ was served in a bottle that has no stickers on it, but rather has its logo and the required information silk screen printed directly on the bottle’s surface.
The „Memory Bank“ is an ongoing project and this video is the first in this series. Every year, at some point when I find the patience and time, I am going to collect all the footage from the previous year and compile it into one music video.
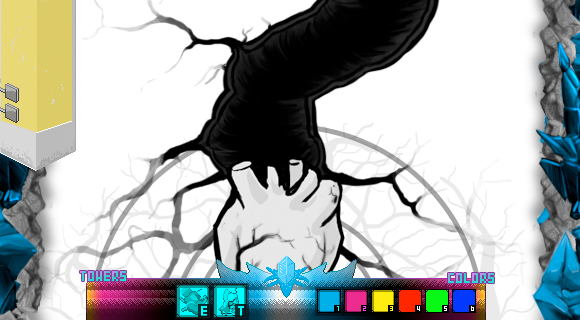
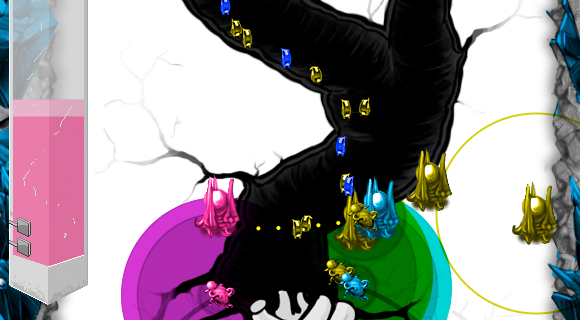
The theory of subtractive color mixing provides the core mechanics for VÄRI. The player is presented with towers that generate fields of colors in cyan, magenta or yellow. These fields are only activated by the heartbeat of the central tower, and only if it is in range. According to color, each field can then trigger towers of its own color, which in turn shoot the upcoming enemies. While only fields of yellow active yellow towers etc., more advanced towers demand the combination of two. With the red, green and blue towers each consisting of the combination of two, VÄRI’s ultimate tower, while only as a concept, would require all fields at once, making it the black tower. Since a tower can only attack enemies of it’s own color ( or a subcolor thereof ), this manifests in an approach to rethink the class system of common tower defense games.
VÄRI was awarded the 1st place in the category „Best Design“ at the local Game Jam venue in Bremen, Germany.
› Game Design ( Art Direction, Interface Design, Logo Design)
The video for „cuboino – Extending Physical Games. An Example.“ is featuring the result of Felix Heibeck’s bachelor thesis. In 2:30 min. the video shows in a playful manner, what the project „cuboino“ is all about.
› Video Work (Camera, Storyboard, Production, Post-Production and VFX)
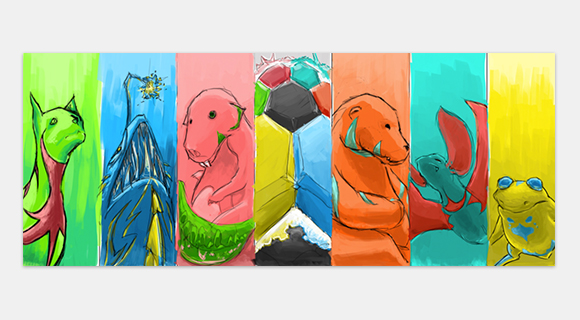
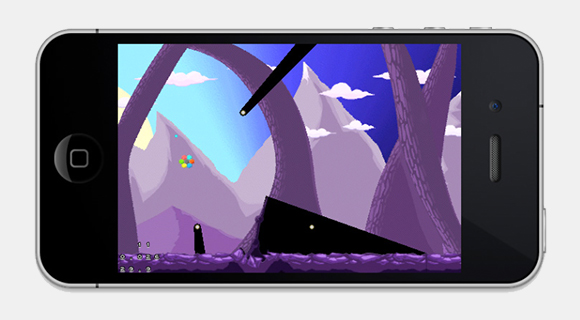
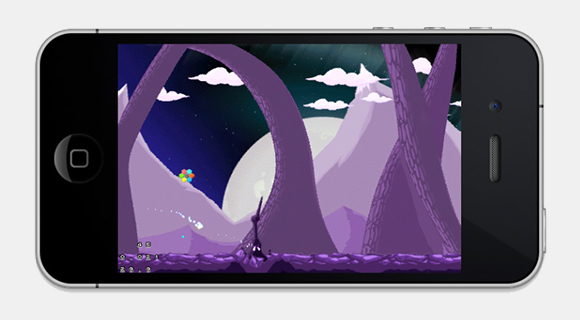
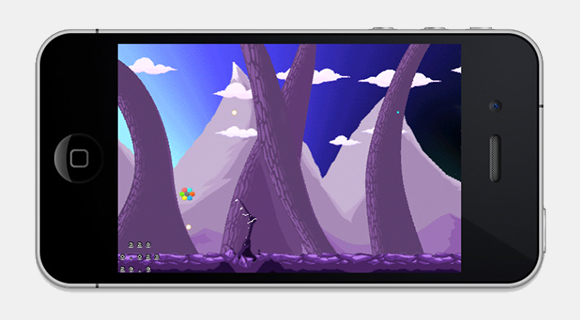
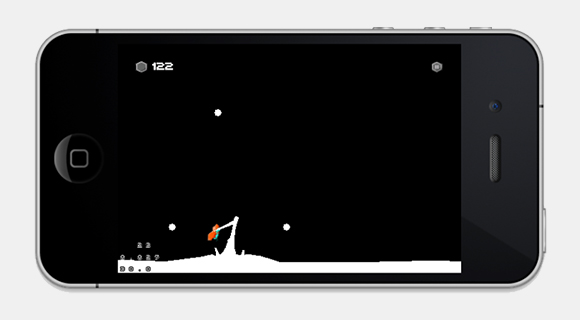
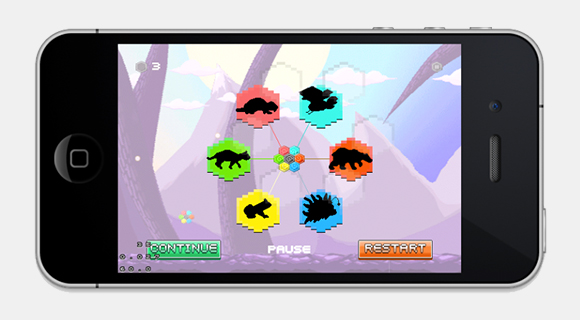
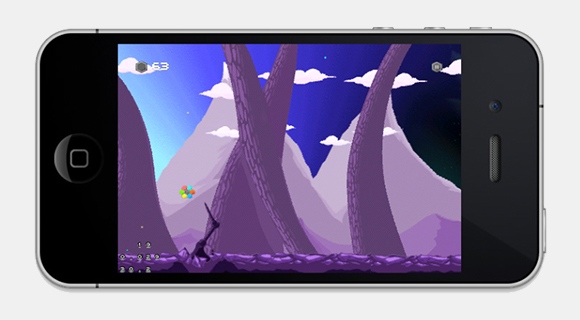
Alien Intelligent Lifeform Aila is a small foreign hybrid, stranded off course one day thus finding itself in a new world. Aila needs to learn and adapt to find its way back home, and face the numerous challenges, from every angle. Although Aila can change her biological presence, every new perspective, brings new adventures.
Seeing is believing? You can’t see at night unless you’re a bat, you can’t see underwater unless you’re a fish. You don’t see what is behind your back or behind obstacles. One lifeform isn’t superior, just more adapted. For now…
Meet Aila, a little alien stranded on earth with the ability to turn into animals and adapt to their senses and vision of their „Umwelt“.
In this fast-paced game for the iPhone you play as Aila in one of her six animal forms to rush through different stages, collect things and try to avoid traps. While playing you have to deal with the actual perception of your current animal. Work in progress
› Game Design ( Artworks, Sprite & Logo Design, Art Direction)
Memories lie within everything, but what if our audio and also visual memory is gone and only the sense of touch in our subconsiousness of certain things remains – with no option to express it anymore.
› Video Work ( Director of Photography, Cut, Effects)
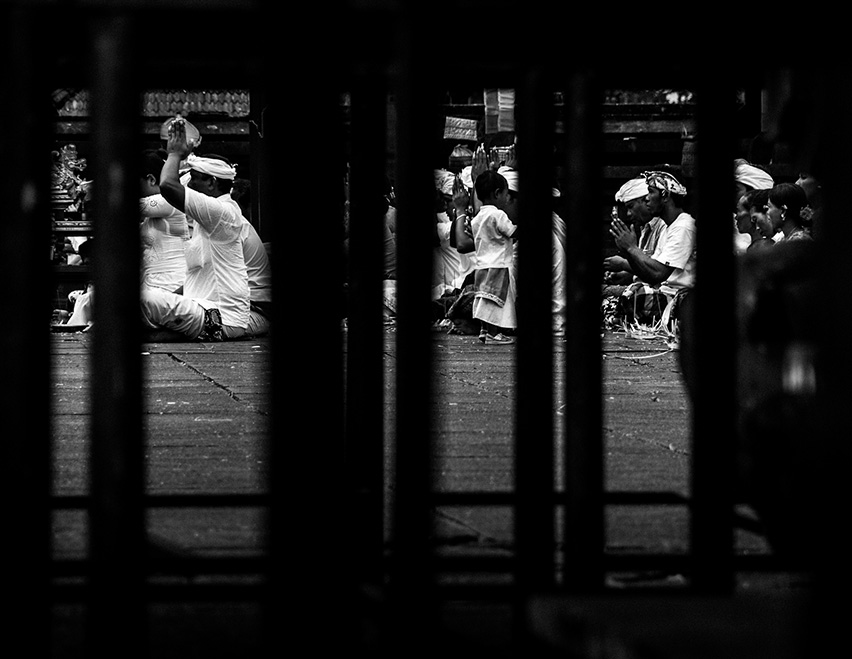
Photo journey across Bali, Indonesia. Since I’ve been to Bali several times as a kid I wanted to see the rich balinese culture again with adult eyes and understanding.
Photos were taken as part of a photography course I had in Art School in Thailand.
Lecturer: Simon Larbalestier
 with the help of the UM2 printer i can quickly pump out designs from my cad program Fusion 360, which i only got to learn in the last few weeks and already got quite proficient in it.